Sunday, March 18, 2012

NYC Half

This is what it feels like to run through Times Square:


Today I ran the NYC Half, my 56th New York Road Runners race, as a training run for my April 15 Marathon de Paris. My net time was 2:27:45, a minute off my 2008 event PR (because I lost 3 minutes taking pictures in Times Square!), which is great because I was in peak condition then. Most importantly, I felt strong and powerful, clearly benefiting from 11 P.T. sessions so far on the IT Band syndrome that presented itself in January's Miami Marathon. I feel good!

As you can see in that video above, it is a rush. Doing a Big Apple takeover is a one-of-a-kind experience, and with apologies to all yellow cabs, Times Square belonged to me and 15,335 other finishers (7,456 men, 7,880 women). I have run it twice before but I got giddy as I went from lane to lane, looking up like I was new here. You have not run a race until you run the NYC Half, trust me on that.

It is something my friends at NYRR know full well, too. The entry fee is now the same as an expensive marathon just about anywhere else in the world. Demand is heavy, for a reason.

The Race:

My corral was at Strawberry Fields in Central Park, near 72nd Street on West Drive. Ethiopia's Firehiwot Dado, the 2011 NYC Marathon winner, would win the women's race, and Kenya's Paul Kirui would top all men. I mention them here because the starting ceremony featured the introduction of elite runners, Meb, Kara, an impressive crew. It was about 48 degrees consistently, just chilly enough to force long sleeves for most.

This time it ran counter-clockwise around Central Park, which for me is trickier because you have to go straight up Cat Hill and even bigger Harlem Hill. I shredded both hills. My pace was 10:00 each of the first two miles, and I knew around mile 4 that I needed to chill a bit as the park can sap your strength later. After a full loop, we proceed to the 7th Ave. exit on South Drive and then comes the real thrill.


Seeing Times Square alit in front of you, totally yours, is a sight to behold. Fans lined up behind the barricades on each side. To the left, Carnegie Hall (getting a facelift). To the right, the giant Lorax sign, Broadway theaters, the giant "Mama Mia" sign. Three times I removed my iPhone from my spibelt so I could shoot videos or pics, and that would wind up costing me my PR but it's worth it! It is fun and you find yourself giggling as you dominate where hustle and bustle normally rules.

[Updated 10 pm ET Sunday: We went to see The Lorax tonight. Felt like the picture must have been an omen. It is a great message, highly recommend the movie to anyone!]

Then we turned right on 42nd Street, and there I saw my Big Cats running friend Roxygen, speaking of Mama Mia (expecting!). She took this picture:


Musical performers are all along the course after Central Park, and they are a nice pick-me-up. We turned left on West Side Highway, and from there is a straight and flat shot all the way through the Financial District. There was one weird moment, and that was when we went past our MLBAM HQ at Chelsea Market: Up ahead you saw the new Freedom Tower, only the top was obscured and seemingly missing in thick fog, a smoky look that was an eery reminder of 10+ years ago.

Then suddenly we were alongside Ground Zero, and I could look at the comeback construction and then focusing again on my form, doing whatever it took not to walk. I saw one sign that said: "DRUNK BY NOON SOON" -- a reference to the finish at South Street Seaport. It was a runnerup to my favorite sign of the day, though, seen at Central Park: "DON'T STOP: PEOPLE ARE WATCHING YOU!"

I had a surprise next, not having examined the new course layout closely enough. Expecting to go straight to Battery Park and then circle the bottom of Lower Manhattan on the streets, we went straight down into the Battery tunnel, which you would normally take to Brooklyn. It was all of Mile 13, just us runners all packed in there literally waiting for the light at the end of the tunnel. I was among those who yelled in the echo chamber, keeping ourselves amused as we marched on toward South Street Seaport.

That is where we finished the NYC Half. We received a medal and even a heatsheet, a sign of how big this half marathon has become. We also marched forever past baggage pickup stations (I didn't need it, thanks to Lisa dropping me off). Check out the medal:


Here is where it wound up:


I met up with Lisa, and while others celebrated at South Street Seaport, I was fine with heading home and walking my English Bulldog King Bingley. He had a great outing, too!


Friday, March 9, 2012

Training Tips

I am running the 4/15 Marathon de Paris because I was not accepted in the 4/22 London Marathon lottery. I still have enjoyed my regular London Marathon emailers, for tips like these:

Training tip 1

How can I prepare myself for the difficult second half of the marathon?
If you are well prepared, the first two hours of the marathon will be relatively easy. After that, things start to get a little more complicated. Not only will you become increasingly physically tired, but your mind will also be telling you that it's time to stop and have a rest. To counteract this, try to make your body move more efficiently in the first half of all your training sessions from now on. If you feel in control of your body, your mind will adapt to this and you'll gain a psychological advantage for the second half of the marathon.

Training tip 2

How do I deal with nerves? Nerves are an integral part of races and for the first-timer they are with you pretty much from the time you enter the event to the minute you run over the finish line. Try and talk to people who have run your chosen event before and ask for some tips about getting to the start and about the course, to put your mind at rest. Read as much as you can about the event, both in the race-day instructions, that you should be sent a month or so beforehand, and on the race website.

Thursday, March 8, 2012

Eat What @Marathoner Eats

Looking for some running recipes? Follow my Pinterest board Eat What @Marathoner Eats - tasty! And remember to always eat a little bit every few hours, including protein, so you don't get that starving feeling that makes you rush for the burger. It is my hardest thing to follow and something I try to think about every day. Please feel free to leave some of your own favorite running food tips here as well!

Tuesday, February 28, 2012

Willemstad Colors


Beautiful Willemstad, the capital city of  Curaçao. I took this picture 2 years ago on our wedding anniversary there. A former governor of the island was plagued by headaches that he felt was caused by all of the white buildings, so the townspeople got together and each painted in pastels to please him. Today their famous architecture is testament to that.

Wednesday, February 15, 2012

2012 Miami Marathon Action


I decided that the big orange word "PROOF" was appropriate to keep on this one, and not just because the colors match. Somehow captured the 2012 ING Miami Marathon for me at least! Not sure exactly where, but the hat was backwards so that means it had to be in the last 5 miles.

Sunday, February 12, 2012

How To Make A Butcher Block Cutting Board


When I am not working in Baseball and training for marathons, I am enjoying my new Baseball Workbench that I built over the offseason. For my first project, I wanted to make an awesome Butcher Block Cutting Board. It was therapeutic and fun. For those interested, I offer these steps on how to make one yourself.

1. Lumber and supplies. We went to Home Depot and bought the following: 3 2x2x10 red oak boards; 2 24" clamps; Mineral Oil; lambswool stain applicator; sandpaper (80, 120 & 180 grade). Hardwood is required and it can be expensive, so it is important to calculate cuts there. I would get 5 2-footers out of each board, so 15 lengths to use, a few of them extra. Make sure boards are not warped. Look for varied color and grain. I had the lengths cut for me there on the spot.


2. Measurements. First measure your kitchen counter space for desired dimension, and don't forget to also measure the storage area where you place the board when not using it. Now you know how big to make it. I wanted 1 1/2' wide by 2' long, so I knew I needed 12 boards side by side - each of them 2" wide. Position the boards as you wish, making the best contrast of colors and grains - the fun part.


3. Even one side. I used one of the extra boards to place on the left side and then tapped all of them so they were even with that one. That told me if I needed to trim down any boards on the other side before getting under way -- just so they are roughly at same length and to eliminate unnecessary waste. You will need to cut both edges later, regardless.


Here's a side view:


4. Glue it together. Use a waterproof wood glue. I bought 2 Titebonds, and that wound up being a bottle and a half too much, so I'll just reserve the rest for later use.


Apply zigzags of glue to each side -- excluding the outside of the outermost boards. I found it easiest to stack them. Smear the boards together for even covering, and then just keep stacking all the way to the top so the board is inverted. Wipe excess glue as you go.


5. Clamp press. Lay two extra boards in a crossing direction on each side, and with a helper carefully lay the glued cutting board on its side so those support boards keep it from laying directly on your workbench. That way it won't adhere to your workbench. Use your left edge again so one side is flush, and then take your two (or three) 2-foot clamps and make a press. Wipe the excess glue on one side, then flip it and wipe excess glue on the other. Use a little warm water in a bucket and rags to wipe the glue. Leave it for 24 hours to set, repositioning the clamps once or twice along the way to help ensure even pressure.


6. Trim both sides. After the glue has dried, use a square and mark a straight line where you can trim the least amount of each side. Using a circular saw, the heighth should be just right to simply shear off each side. That left me with about 23 1/2 " length.


7. Sanding. Use a power sander and I recommend three grades of sandpaper -- 80, 120 and 180, so you start with coarse grit and gradually work up to a velvety buff. Begin with the stick-on 80 discs, and smooth out the rough surface. I went through a few discs.


Flip the board once it is as smooth as you wish.


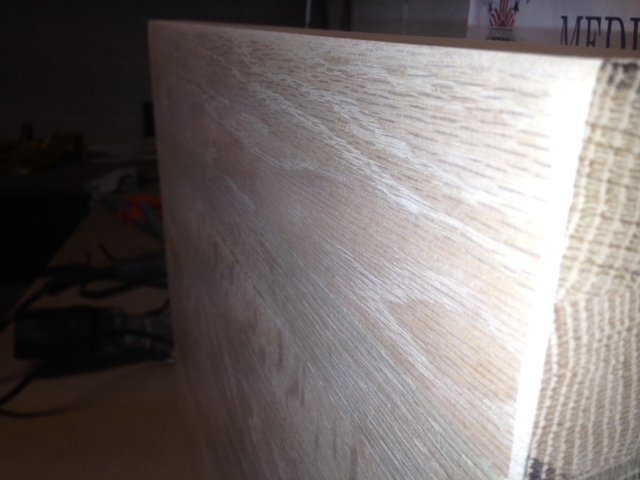
Here is how the texture of the wood is looking at this point. Note that I started rounding the edges and corners at this stage, but be careful not to overdo it with the 80-grade. You also can round simply with the 120 at the next step. TIP: At this stage, make sure the entire cutting board is flush and has no wobbling. If it does, sand down any elevations.


Use the power sander for the second sanding as well. I used 120 grade stick-on discs and removed any remaining roughness.


To sand the sides, I placed the board in my vise lock, repositioning it after each side.


For the final sanding step, you'll need three or four sheets of 180 grade, a buck each. You can use a sandblock if you wish, but I prefer one foldover and a nice, easy rub all over the board, including sides, edges and corners.


You'll love how it feels rubbing your hand over the board:


8. Own it! Just for fun, I used an awl and ink pen to brand my first initial in a side.


9. Protect it. Mineral Oil will be a fact of life with your butcher block, and at the outset you want to apply three or four coats. Home Depot had food-safe oil in its Stains aisle. I highly recommend using a lambswool stain applicator, because it made it so much easier than only rags.


Again use the two extra boards as crossing supports to elevate the cutting board off your workbench. That way you also can apply to the sides. Lismo helped me at this stage, a good time to use that teamwork! Wait at least 20 minutes after applying each coat, so start with one broad side and hit all four edges at the same time. Wipe the excess oil. As you can see in this picture, Joltin' Joe is watching my every move and Babe is staring out into the distance, calling his shot.


After waiting for the fourth coat to dry on that side, place a towel over your cross supports. That way you will not be flipping the board directly onto wood yet. Now repeat the same process for another three or four coats, but don't worry about the sides. Let it dry. Between one of the last coats, I let King Bingley snooze on top of me while I waited:


Once the last coat dries, wipe off any excess oil, using rags.


Take your finished product to the kitchen. Sit in on the table. Smile!


10. Caring for your Butcher Block Cutting Board. There are three crucial steps to clean and preserve your masterpiece: cleaning, sanitizing, and sealing. I recommend you watch this video, which was all the help I needed. Bon appetit!

Monday, February 6, 2012

Looking at the Race Calendar

I am training for the Paris Marathon on April 15. It will be my ninth marathon or ultra, and it will finish my first trip to Europe! Maintaining fitness, nutrition and stretching out my left IT Band are my running priorities these next two months. I would love to find a good Half to run this summer.

Take a look at this embeddable race map below from Race-Calendar.com -- you might find this useful to embed in your blog as well. Follow @racecalendarcom and let them know what you think. Also be sure to follow me @Marathoner.

Races in United States of America courtesy of Race-Calendar.com. Click here to add a race